Sunday 28 April 2013

Quick Weekend Bake : Sour Cherry & Almond Swiss Roll


 photo 63ae74a1-b083-411d-aeec-ff25c71832d9_zps3df527e4.jpg


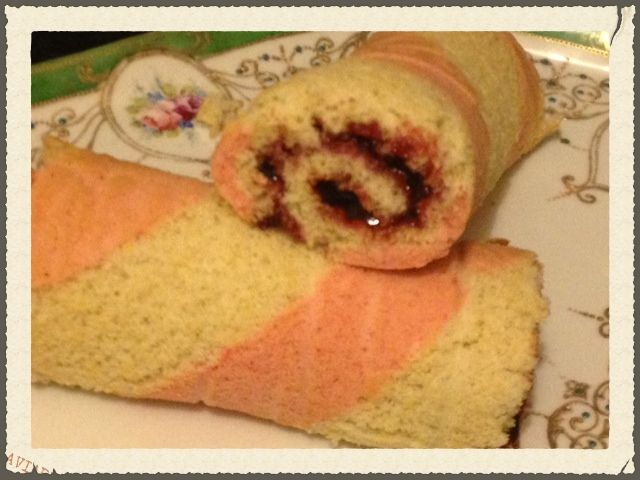
Sometimes I feel the need to get up and bake at the strangest times! This idea came to me during Country File on a Sunday night and was ready to eat by the end of The Antiques Roadshow! I fancied making something quick and easy and challenging myself to go into the kitchen with no recipe and make something a little bit different to the norm from a recipe I had in my head for a basic fatless Swiss Roll .. so here is my Sour Cherry & Almond Swiss Roll. I am really pleased to say it came out really well, next time I might add slightly more colour paste to the pink stripe and might even experiment with some patterns. 

The stripy pink sponge is just me being me and is totally optional ... this tastes exactly the same if you just want to make it without the stripes! 

You will need: 

3 large eggs
80g golden caster sugar 
1 teaspoon almond extract
60g plain flour 
20g ground almonds
Half a jar of sour cherry preserve (the best one I have found is available at Aldi!) 
Pink food colouring (optional). 

Swiss roll tin & parchment paper to line. 2 disposable piping bags. Extra parchment for rolling. 

Grease and line a swiss roll tin with parchment paper. Pre-heat the oven to 180 degrees C. 

Break the 3 eggs into a large bowl with the caster sugar and almond extract. Whisk until the mixture has at least doubled in volume and is at the "ribbon" stage - when you lift the whisk out of the mixture you should be able to draw a little picture in the mixture and will take about 30 seconds to disappear. If it disappears before that .. whisk more! 

Sift the flour & ground almonds into the mixture and carefully fold this in with a large metal spoon. You have used lots of energy getting the air into this mix to remember to fold - you need to keep the air in. 

When the flour and almonds are incorporated remove 1/3 of the mixture and colour with the food colouring to your taste, FOLD the colouring in. 

Place the 2/3 of uncoloured mixture into one of the piping bag and the 1/3 pink mixture into the other piping bag. 

Snip the end off the bags and pipe the mixture into stripes. Keep an even pressure and the mix should be about 2cm deep. 

Place the swiss roll tin into the oven on the middle shelf and bake for 10-12 minutes, the cake is done when it comes slightly away from the tin and shrinks. 

Remove the cake from the oven and leave to cool completely in the tin. 

When the cake is cool tip on to another piece of parchment paper and peel away the paper that was used for baking. Quickly and gently flip it over so the browned baked side is now facing towards you, the funky stripy side is hidden. 

Spread the cake with an even layer of sour cherry preserve (any jam you fancy will do though - raspberry would also complement the almond flavour). 

Roll the cake up into a tight roll, I find it easier to roll "away" from myself. Give the roll a quick roll forwards and backwards to seal it up and place the roll with the end on the bottom. 

Slice and serve. 

This recipe makes about 8 generous slices or 12 "dainty bites".  As Swiss Roll has no fat content it goes dry quickly - store wrapped tightly in a piece of parchment paper or in an airtight container. 


Sunday 21 April 2013


The 15th of April was circled on my calendar for all the wrong reasons. Back to work after the long lie ins and freedom to do whatever I want of the Easter Holidays. Without starting a debate about teachers holidays they are well needed, and for some reason I never get done what I need to, I tend to fall into an abyss of staring into space and recharging my batteries. I always have so much baking I want to do but never quiet get round to it. For some reason when I am back at work, frazzled after a day teaching a lovely (but demanding) group of young'uns with learning disabilities I get the urge to bake with urgency again, I think it is simply how I relax and unwind. 


 photo paulhollywood_zps31966e74.jpeg 

So, without further a do here is my round up of "first week of term" baking. All from Paul Hollywoods "How to Bake" .. which I purchased DURING the holidays and just flicked through salivating sporadically while fixed to Bargain Hunt *Can't.move.until.after.Doctors*, oh, I did leave the house to buy a banneton but didn't use it until after the holidays :) 

I have made,White Sourdough (blob did good), Croissants, Pain Aux Raisins - which involved my first ever attempt at crem pat, it was ace, didn't lump up and made such a quantity there is half in the freezer and finally Milk Bread.  Obviously I can't give details of the recipes here - I will leave you to rush out and buy the book for that, I can assure you it is very good, the recipes and pictures are very clear. I come at this from the angle of a home baker that knows "quiet a bit already" , BUT friends who are new to baking also claim they have had great success.  Everything tasted great and was wolfed down by the gannets at home and work but out of everything I fell in love with the milk bread. Ohhh milk bread, my new obsession. Fluffy, creamy, soft, tasty ... ohhh milk bread, I salute you, especially with eggs, bacon and a good old pork and leek sausage. 

Cue the pictures ... and if you want the recipes, you can buy the book here (saves you Googleing it hey! :


 photo milkloaf_zpscacb19ac.jpeg
Milk Loaf - creamy, fluffy, DELICIOUS 
 photo painauxraisins_zps09061455.jpeg
Pain Aux Raisin, lasted 10 seconds when I took them to work for breakfast! 
 photo sourdoughandcroisaans_zpsaf019f25.jpeg
First ever white sourdough from my new culture and fresh croissants 

Wednesday 10 April 2013

Mock Holland Cream - Suitable for Vegans


Okay so look at the ingredients below ... and wonder how this ... 


 photo image_zpsa5f98c7d.jpg


Becomes this .... 


 photo image_zps152d22ad.jpg


I am going to show you. It's called "Holland Cream" or "Mock Cream" and it's one of those recipes when really you have to ignore the ingredients (and dare I say the fat content) and concentrate on the taste because it is seriously yummy! I have been hunting high and low for a mock cream for years, WHY? you might ask when the real deal is so good but a lot of the retro recipes I like to play with really need this stuff. It was used during WW2 as a cream replacement and some well known bakeries still use it today on their "vanilla doughnuts" and even trifles! I am not going to lie to you and say it tastes just like dairy cream, of course it doesn't .. have you looked at the ingredients? It is however a delicious frosting type filling and I will be blogging about it again when I wax lyrical about my pineapple cream tarts ... dare I say I think I prefer it to buttercream ....

Mock Cream Recipe (enough to frost a big cake or fill 25 doughnuts).

50g caster sugar
30ml water
60ml vegetable oil
100g Trex (Vegetable shortening - if you are reading this overseas you need Crisco)
5ml vanilla extract
250g icing sugar.


First make a sugar syrup with the caster sugar and water, bring to the boil and make sure all the crystals are dissolved. Use a wet pastry brush to brush the sides of the saucepan to make sure all the crystals are dissolved (it is REALLY important all the sugar is dissolved otherwise your mock cream will be grainy).

Leave the syrup to cool completely (and I really mean totally cool - the first batch I made messed up because I was too impatient).

Once the syrup has cooled but it in the bowl of a freestand mixer (or a bowl if you are going to use hand mixer) and add the Trex, vegetable oil and vanilla extract and beat until it is all very smooth.

Now add the icing sugar a little at a time and beat for approximately 7-8 minutes until it is thick, creamy and smooth.

Oulia - Mock Cream. You can spread it, pipe it, eat it, freeze it ... but don't tell your friends how you made it UNTIL they have eaten the lot and fallen in love ;)


Tuesday 9 April 2013

Fruit Salad Meringue Pie

I love Lemon Meringue Pie. I have been trying to design the perfect pie for years. Delicious soft meringue that doesn't weep, buttery thin pastry and most importantly a tangy pie filling that keeps it shape when cut. I think I've got it .. only it's not Lemon Meringue pie it's my "Fruit Salad" pie - inspired by those lovely little sweeties from the penny range. The pie filling contains pureed raspberries, oranges and lemons, it's really tangy and refreshing and cleansing on the pallet .

 I have chosen to use an Italian Meringue for the topping. The soft marshmallow texture just goes so well with the tart filling and buttery pastry. For me this is perfect. If you want to go for the more traditional French Meringue of course feel free but expect seepage which might ruin your crispy short crust.  

This recipe is for a traditional 9 inch pie dish. I use a falcon enamelware dish. 


For the pastry: 

250g Plain Flour 
50g icing sugar 
125g unsalted butter
1 large egg 
teaspoon of whole milk.
Zest of 1 lemon (optional).

Put all your ingredients in a food processor. Pulse until it comes together in a loose ball. Tip the pastry on to a work surface and gently press into a definite ball shape. DON'T overwork it (my rule is to touch it as little as possible), you want your pastry to be buttery and light. Wrap your pastry in cling film or a sandwich bag and pop into the fridge for at least half an hour. 

Once the pastry has rested roll out into a thin disk (you are aiming for your pastry to be as thin as possible) and place into the pie dish, press the pastry lightly into the dish, I always think at this stage gravity is your friend - don't force it and go slowly. Place a piece of parchment paper inside the pastry with baking beans (or rice / kidney beans  etc) and blind bake for 20 minutes at 180C, take the pastry out of the oven after 20 minutes and remove the parchment and baking beans. If the pastry still seems soft bake for another 5 minutes without the parchment paper. 

Place the cooked pastry shell to one side to cool completely. 


For the filling: 

150g fresh raspberries
2 lemons (zest and juice)
1 medium orange 
85g unsalted butter cut into pieces
3 egg yolks
1 whole egg 
100g caster sugar 
2 tablespoons of cornflour 
50ml water


Push the raspberries through a sieve, collect the juicy pulp in a bowl and throw away the seeds. 

Zest and juice the 2 lemons and add to the raspberries.

Juice the orange and add to the raspberry / lemon goodness. 

Place the caster sugar and cornflour in a saucepan, pour in the fruit juices and the 50ml of water, stir over a medium heat until it thickens, watch it like a hawk and don't walk away or stop stirring during this process! Once it starts to bubble remove from the heat. 

Add the butter and stir in until melted and well incorporated. 

Leave it to cool further for a few minutes before beating in the 3 egg yolks and whole egg. 

Your filling is now ready - have a taste .. I always do! 

Pour your filling into the pastry case and smooth over. 


This is where my pie differs to traditional lemon meringue pie, because I use Italian Meringue we are not going to be baking the pie in the oven but we still need the filling to set.

Place a large baking sheet on the top shelf of your oven, place the pie on the bottom of the oven and bake at 170c for 15 minutes. This is a nice slow bake just to set the filling. Keep an eye on it and make sure your pastry is not burning, the sheet at the top of the oven should prevent this. 

Take the pie out of the oven and leave to cool completely. 


For the Italian Meringue: 

A little note on Italian Meringue - it is pretty difficult to achieve this without a freestanding mixer, this is because it is difficult to pour molten hot sugar syrup into your egg whites without scalding yourself - go forward with caution if you choose to go for it with a hand mixer or dare I say it a good old fashioned whisk!

4 egg whites
200g caster sugar 
200g of water (yes .. weigh it !!) 
A pinch of cream of tartar. 
A sugar thermometer or thermopen

Put your egg whites and a pinch of cream of tartar in the bowl of a freestanding mixer. Use the whisk attachment on a medium speed to bring your egg whites to soft peak. 

Meanwhile put your sugar and water into a saucepan and bring to a rolling boil on a medium heat. Watch your sugar thermometer the whole time, you want to bring the temperature up to 112c (soft ball stage), this usually takes 15-20 minutes, when it reaches 115C turn up the heat and bring the temperature quickly up to hard ball stage 121C .. at this moment you need to turn your mixer up to high and quickly pour the syrup in one fluid movement into your stand mixer. 

Keep whisking your meringue until it is completely cool. About 15 minutes. 

This is the stage where it is very difficult for me not to plunge a huge spoon in the bowl and eat the lot .. but I digress. 

Spread your meringue in peaks and swirls on top of your pie, you can be as pretty or as rustic as you like. You could even pipe it if you are feeling particularly frivolous. 

I love the look of the pure white soft meringue on my pie but if you want to be really fancy you can colour the peaks with a catering blow torch or pop it until the grill until it is lightly golden. 

Leave the pie for about an hour before you dive in ... 

Enjoy :) 


Welcome to the Blogger-sphere ..

To blog or not to blog .. that has been the question for some time. I have finally given in and decided to make a compendium of my daily baking obsession. I love writing, I love the internet and I love sharing ideas so it seemed the right thing to do. This is going to be a place where I write down what I usually bore my poor husband about, recipes, ideas and reviews. 

I am not a trained baker in anyway, it's just something I have done for as long as I can remember. My bathroom weighing scales have always been the primary piece of evidence to back this up ... well, my Dad always said, "never trust a thin chef" ... I am also a social historian which means a lot of my recipes are often taken from history and tweeked. I am certainly an advocate of "Granny knew best". There is nothing more lifting than a taste of childhood, of happy times and when the most important thing in my day was being allowed to stay up to watch Keith Floyd! 

A little bit about my baking style. Really it's just want I like. I am a home baker but really try to concentrate on taste. The most delicious looking piece of glossy pastry in a shop window is nothing if it actually doesn't taste good. This has happened to me (unfortunately) too many times than I like to remember. There is nothing worse than sitting there with the most delicious looking tarte citron that actually tastes of watered down lemon juice with a tasteless generic pastry. Don't even start me on my piece of Sachertorte in Budapest ... I still want to cry thinking about it .. which brings me nicely on to my passion, I am passionate about food, it actually affects my emotions, bad food sends me into a rage. Literally. Be warned.